-
Recent Posts
Recent Comments
Category Archives: Uncategorized
Saw Milling Test
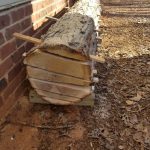
Last fall prior to Hurricane Florence I took down some good-sized white and red oaks. These were great trees but both had large limbs overhanging/threatening the garage, so they had to go. Rather than cut them up for firewood as usual I let them stay where they fell through the winter. Today was unseasonably warm and I took a stab at milling one of the logs. Drying takes a long time, so the point of this was to get at least something started – this way if I don’t finish milling the rest of it for a while I’ll at least have something in the queue.
To make the milling cuts I just free-handed with the chainsaw and there’s a good bit of variance in thickness as a result; to get straight boards I’ll have to deal with this variation at the joining/planing stage. For the next attempt I plan to build a metal guide frame over the saw to allow it to rest level on top of either a ladder laid on the log (first cut) or the level surface made by previous cuts. Also, my saw is a middle/low power model (3HP) and bogged down occasionally. Normal chainsaw chain is meant for cross-cutting and takes too big of a bite for ripping, for the next attempt I plan to modify an old chain into a ripping chain by grinding back some of the teeth – these converted teeth will help clear chips out of the cut rather then cutting themselves and it should mean less bogging down.
Once milled, the log was reassembled with some ‘sticker’ pieces I cut from scrap 2×4’s to create airflow gaps. It’s under an overhang that should provide enough rain protection. The drying happens from the inside out over a long period of time, getting wet from rain only temporarily increases the moisture level on the outside; this dissipates quickly and doesn’t hurt the overall dry time. Drying should take about a year per inch, the slabs are about an inch and a half on average so I may be able to use these as soon as next summer.
We have some ideas for the wood but no immediate plans; this is just a long-term thinking/prep. The white oak is good outdoors and may become some much-needed patio furniture. The red oak may be used to upgrade the fireplace mantel and be used for a headboard and side tables.
Dust Collection
This weekend I installed the shop dust collection system. The system consists of several parts:
Fan/Motor: I repurposed a portable dust collector fan I’ve had for a while that’s been underutilized (collecting dust, but not as intended). Space is limited in the mechanical room so since the fan won’t need easy access I mounted it high up above the air compressor near where the dust collector pipe enters the mechanical room.
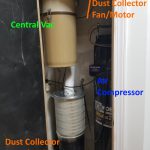
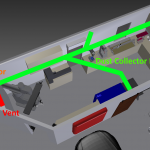
Pipes: 4″ PVC DWV pipes; there are a few branches leading to the different tools. I tried to keep the overall length as short as possible and the bend radius’s large.
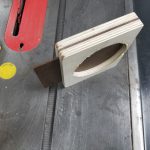
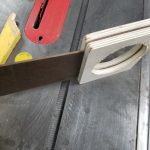
Blast Gates: The blast gates control the air flow though the system by blocking off unused branches. I made these with 1/2″ plywood and 1/4″ hardboard. Circle cutouts were made on the lathe to match the pipe outside diameter exactly.
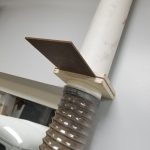
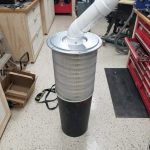
Filter and Collection Bin: The portable dust collector came with a light canvas bag that restricted the air flow massively while still allowing fine particles to escape. To improve this I replaced the bag with a semi truck air filter mounted to a trash can. The theory is that air will exit the filter and larger dust/chips should fall into the trash can below. There are purpose-built dust collection filters available, but the costs are much higher for these and the semi truck filter has the same specs; different economies of scale. To mount the filter to the bin I made a plywood ring, for now they’re just taped together but I may add latches at some point. The design may need some tweaking; I’ll know more after it gets further use, but for now the airflow is excellent.

Return Vent: Having the collection bin in the mechanical room created a problem; the mechanical room is well sealed for noise reduction, so there was nowhere for the air exhausted from the filter to go. For heat/air to be retained in the shop, the exhaust air needed to return to the shop via a vent. Since I also wanted to keep the mechanical room noise level as low as possible this meant the vent needed to be sound proof. I built a sound proof vent by creating a 3ft long box and offsetting baffle plates inside of it. The sound has to reflect a dozen or more times off of the baffle plates; at each reflection it gets absorbed some by a fiberglass lining. The air, however, is able to snake around the baffles and find its way out. The inlet to this vent also points directly at the floor away from the sound sources. Somehow after adding this vent the mechanical room noise is actually noticeably quieter than when it was completely sealed. I think this may have had to do with the air pressure changes resonating in the previously sealed room, whereas now any fluctuations are equalized through the vent.


Control: For now control of the system is via a remote control outlet (repurposed from controlling the vacuum at the old shop), at some point I may integrate some low voltage switches with the blast gates so the motor will turn on as soon as any gate is opened.
Workbench Flexibility
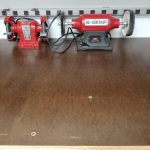
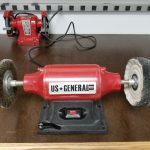
There are a few things that need to be solidly mounted to the workbench in use but that otherwise make sense to be easily moveable either for storing out of the way (bench grinder, polisher) or to make way for big projects (vise).
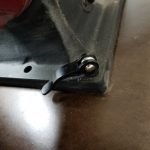
To allow this, I installed threaded inserts into the workbench in key locations and then used bicycle style quick release bolts to attach/detach tools when needed. I also cut the bolts down so they have 4 or 5 turns of engagement to make threading quick.
I’ll also be cutting the grinder and polisher cords to the exact length to the nearest outlet from this position, this makes it easier/neater to store; if I ever need to use these somewhere else temporarily I can always use an extension cord.
Planer Cart
(I’ve had this built for a while now, but I’m catching up on documenting shop progress tonight)
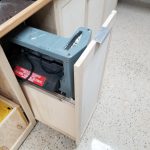
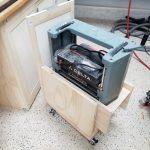
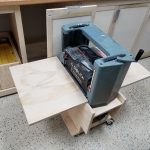
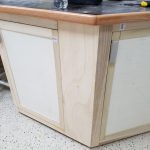
A while back I got an old Delta ‘Portable’ power planer at a garage sale; it’s helped out in a few projects already so I thought it deserved it’s own spot in the shop design. The planer requires a fair amount of space for it’s infeed and outfeed to keep the material flat, however the planer isn’t used enough to justify keeping it out on the workbench permanently. I also wanted to avoid the need to lift it out of a cabinet, so with this in mind I came up with the cart below that integrates with the cabinets. The cart rolls on double-locking casters and has folding infeed/outfeed tables that align with the planer’s table when upright. I used ‘drop leaf’ style hinges/supports to allow the tables to lock in place.
The ‘dead’ space inside is currently holding the router and router bits; I may convert this to a drawer at some point. When the cart is stored it just looks like any ordinary cabinet door.
Cabinet Handles
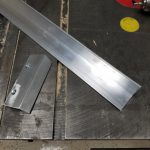
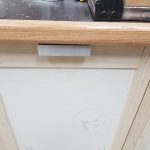
Over the last few nights I’ve been working on handles for the cabinets. The handles are 4″ sections cut from 1.5″ aluminum angle. Before cutting to length I ripped ~1/2″ off of one side of the aluminum so the handles weren’t too wide. This was my first time cutting aluminum on the table saw, it was very quick and effective but also shot scalding hot aluminum chips in every direction and sounded like a Pterodactyl being fed through a wood chipper.
Since I may add/change cabinets in the future I wanted to make sure that I wasn’t locked into a particular brand/model of handle that could be discontinued, by making my own with standard materials this isn’t a problem and the cost was also kept to a bare minimum.
Once all the sections were cut to length I sanded the rough edges and drilled/countersunk holes on the drill press. I made a quick fixture with clamps and wood blocks to get the holes consistently located. To attach the handles to the cabinets I chiseled out a 1/8″ recess and then attached the handles flush with the door edges.
I’m undecided on whether these will keep their current ‘brushed’ looking finish or whether I’ll polish or paint them. I’ll decide that when the time comes to finish/paint the cabinets.
Shop Cabinets
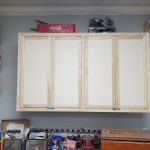
This weekend I resumed work on the shop and made major progress on the cabinets:
– Upper cabinet built
– Another cabinet built for small parts storage
– Doors for existing base cabinets built
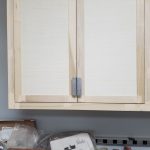
The doors are ‘shaker’ style for simplicity; building these is as easy as cutting a piece of 1/2″ plywood to the right size and then wrapping it in the same 1×2 poplar used for the cabinet face frames. All the door frame pieces got a 1/2″ dado to fit around the plywood edge and then the top/bottom frame pieces had 1/8″ removed from either side of their face on the ends to make a tenon. I found that the majority of the build time is in changing between the various setups needed (cut to length vs dado cutting vs tenon cutting vs cutting plywood, etc) so after the first test door I tried to build as many doors at a time in parallel as possible.
I went with ‘inset’ mounting of the doors because i like the clean/simple look. This gives a lot less room for error compared to overlay mounting since the gap is visible and it and needs to be small and consistent. It’s critical that cuts are within 1/16″ and that everything stays perfectly square or things go downhill fast. For the dados I used an old ‘wobble’ style dado blade (these are so sketchy they’ve been banned in europe); the geometry of this contraption is such that it can’t leave a perfectly square bottom. It’s not really a problem since the dado bottom is internal/unseen, but it made measuring and setting the correct dado depth difficult.
I definitely had a few mistakes to correct along the way, but overall I think it was just enough of a challenge to help improve my woodworking. Next steps are to make handles, make/install drawers for the last open base cabinet, and (eventually) do the finish work of filling/sanding/painting.
Energy Logging with SmartThings and Google Sheets
I’ve recently been playing with whole-house energy monitoring and came across a way to log and retain data using Google Sheets. This monitor (long before I got it logging automatically) also helped size the generator project from earlier posts.
#1 – Aeon Labs Gen5 Home Energy Meter. The meter installs inside the breaker panel and reports current, voltage, power, and energy back to the SmartThings hub via Zwave. The meter monitors both ‘legs’ of the standard residential 120/120/240 feed.
#2 – Samsung SmartThings Hub. The hub connects the Energy Meter to the internet where the SmartThings server allows for custom applications to be developed and run in their cloud.
#3 – SimpleEventLogger. This is an application that’s been developed by the SmartThings community that posts data to google sheets via the google API anytime a particular dataset changes on the SmartThings side. Setup is only slightly more involved than adding any other ‘custom’ apps in the SmartThings IDE.
In addition to the energy data I also have temperature data from the various HVAC zones; the thermostats that came with the house were “RedLink” compatible, so we only needed to add a RedLink hub for data and control to be enabled in the ‘cloud-to-cloud’ connection between SmartThings and Honeywell.
Having this energy and temperature data available will be key in optimizing energy usage and identifying trends/problems over time. I’ve had it running now for a few weeks without issue; eventually/hypothetically the log entries could run the sheet file size up against the maximum storage size for the google account, but the entries are so tiny this can’t really happen in practice.
Generator Rebuild
Hurricane Michael hit our area hard and took out power for almost 5 days. Luckily the small generator we already had was enough to keep the fridge running and some lights on, but not much else. The small generator is 120V only, so it also was not able to power the 240V well pump; 4 nights without running water was not fun. It’s not likely we’ll have another outage that’s this long for a while, but we have had a number of shorter outages that seem to indicate that this will be an ongoing problem – a bigger generator would be nice.
With that in mind we started looking at options; there are a number of ‘off the shelf’ options out there for whole-house standby power, but most of them are very pricey both to install and to run (propane particularly) and we couldn’t justify the cost for something that gets used so infrequently. What did seem to make some sense though was rolling the dice a surplus military generator; the prices are very low (when the condition is unknown), they’re way over-built, and are made to be repaired easily.
I bid on and won an online surplus auction for a diesel generator and picked it up outside our friendly neighborhood military base. It was a fairly easy move at ~1200lb; at pickup I just dragged it onto the trailer with a winch and to offload I tilted the trailer and winched it back down with iron pipes underneath as rollers.
To get it running I first put in new batteries (2x 12v car batteries) and troubleshot some miscellaneous electrical issues (broken connections, dirty switch contacts, etc.). From there it would crank but not run; bleeding the air out out the fuel lines fixed this and it started OK. Once running there was an erratic low frequency rattle that I traced to a bad rotor bearing on the generator head. With this bearing replaced it then ran smooth/quiet. The last issue was twitchy voltage regulation that I traced back to a dirty potentiometer; with this cleaned it held a stable 240V @ 60hz under a variety of loads. Along the way it also got an oil/filter change and a coolant flush/fill.
Altogether this was a very quick project, just a few hours to get everything sorted out. Up next will be setting aside some space for it (probably combined with a new area for trashcans and firewood) and getting it wired in with a manual transfer switch. It’s a “10KW” generator but that rating is on the very conservative side; in reality it’s closer to a 15KW or more consumer unit whose ratings are on the optimistic side. This should be enough to run the lights, TV, well, microwave, and at least one zone of HVAC.
Custom E12 LED Bulbs
For the generator project (more on that soon) I needed some somewhat specialized replacement bulbs to fix the control panel lighting. These bulbs are 6W / 30V (the generator has as 24VDC electrical system) with a E12/candelabra base. They also have to be very short to fit inside the shades on the panel light holders. The 120V version of this bulb, model “6S6”, is very common and 3-packs were available for a few bucks locally. I knew these would probably be too dim but I picked some up anyways and tried them out. Not surprisingly the 120V filament at 30V barely glowed red.
Since the 6S6 bulbs didn’t work, the next option would have been to order the correct 6W/30V bulbs. The price for these bulbs seemed crazy though, so instead (and for less cost) I opted for a 4-pack of 24V LED lights of a similar size. Although the size if the LEDs was similar, the base type was meant for a wedge connection, so I had to get creative in grafting the LED lights to the E12/candelabra bases.
First I broke the original bulbs and chipped away the glass to leave only the base and wires. Next the wires were soldered to the LED bulbs, insulated with electrical tape, and the whole thing was pushed into the bulb base. The base was then filled with hot glue and the joint covered with heat shrink.
In the end I think they went together very nicely and since they’re LED they should last a lot longer while being brighter and draining the generator batteries less; best of all the whole setup cost less than the ‘proper’ replacement bulbs.
Small Parts Organization
Background:
The new shop has given me the opportunity to rethink storage of the miscellaneous small parts I have laying around: nails, screws, nuts, bolts, brackets, cable ties, electrical connectors, fittings, etc. The previous system I had was to sort by type (i.e. nails) into individual plastic shelf bins (the common Blue/Red/Yellow type). This was better than nothing, but the downside was that every time I needed something I had to dump the whole bin into a sorting tray and search.
The new method uses a rack of portable parts storage cases. These cases give the ability to sort by main type (i.e. nails all in one case) but also by individual size (i.e. 1″ finish nails). The cases also have removable bins inside of various sizes; by swapping these around I’ll be able to optimize storage – swap bins between the cases that have more big parts vs those that have more small parts.
I considered the individual drawer style of parts organizers also; when I’ve had these in the past it seemed like I was constantly opening and closing the tiny drawers to look at parts from above; the drawers also easily jammed closed when full. The parts storage cases should prevent both of these problems.
(There are lots of similar projects online that sparked the idea, so this definitely isn’t something I can take credit for coming up with.)
Construction:
Last weekend I built a cabinet to house the ‘machinist’ toolbox used for the mill and lathe tools; the cabinet also supports the lathe itself. For the countertop I’m again using the “Norm Abrams” design – plywood topped with a varnished hardboard layer that’s cheap/easy to replace when it gets too beat up; I had these at the last shop and they worked really well. I left room in the cabinet for this parts organizer idea, so today I just needed to outfit it with shelves to support the parts cases. The rack consists of the shelves themselves as well as spacer blocks that help support the shelves and make it easy to get the correct spacing. The process for making the shelves was as follows:
- Rough cut each shelf from the plywood panel with a circular saw.
- Square and cut the shelf to final dimensions on the table saw.
- (For the first shelf) Drill holes at the corner of the handle area and finish cutting it out with the bandsaw.
- (For all other shelves) Clamp the shelf to the first shelf and trim out the handle area area with the flush cut router bit.
- Run the router over both front edges with a 1/4″ round-over bit.
There’s now an empty space in the cabinet behind the cases that I may eventually tap into and repeat the same idea using the smaller version of the cases; this would be accessed from the side of the cabinet, but for now it’s not needed.
I intentionally got a couple extra cases. This allows more options for swapping around internal bins, but primarily it’s so I have backups in case a case ever gets broken and exact replacements are no longer available.
All that’s left is to add an inset door (the cases are offset to the left to allow room for a door and hinges on the right), a slide-out platform at the top, and then finish trimming/sanding/painting everything.
(I also finished and painted the walls/trim then ground and epoxied the floor over the last several weekends, but I forgot to get in-progress pictures.)


