

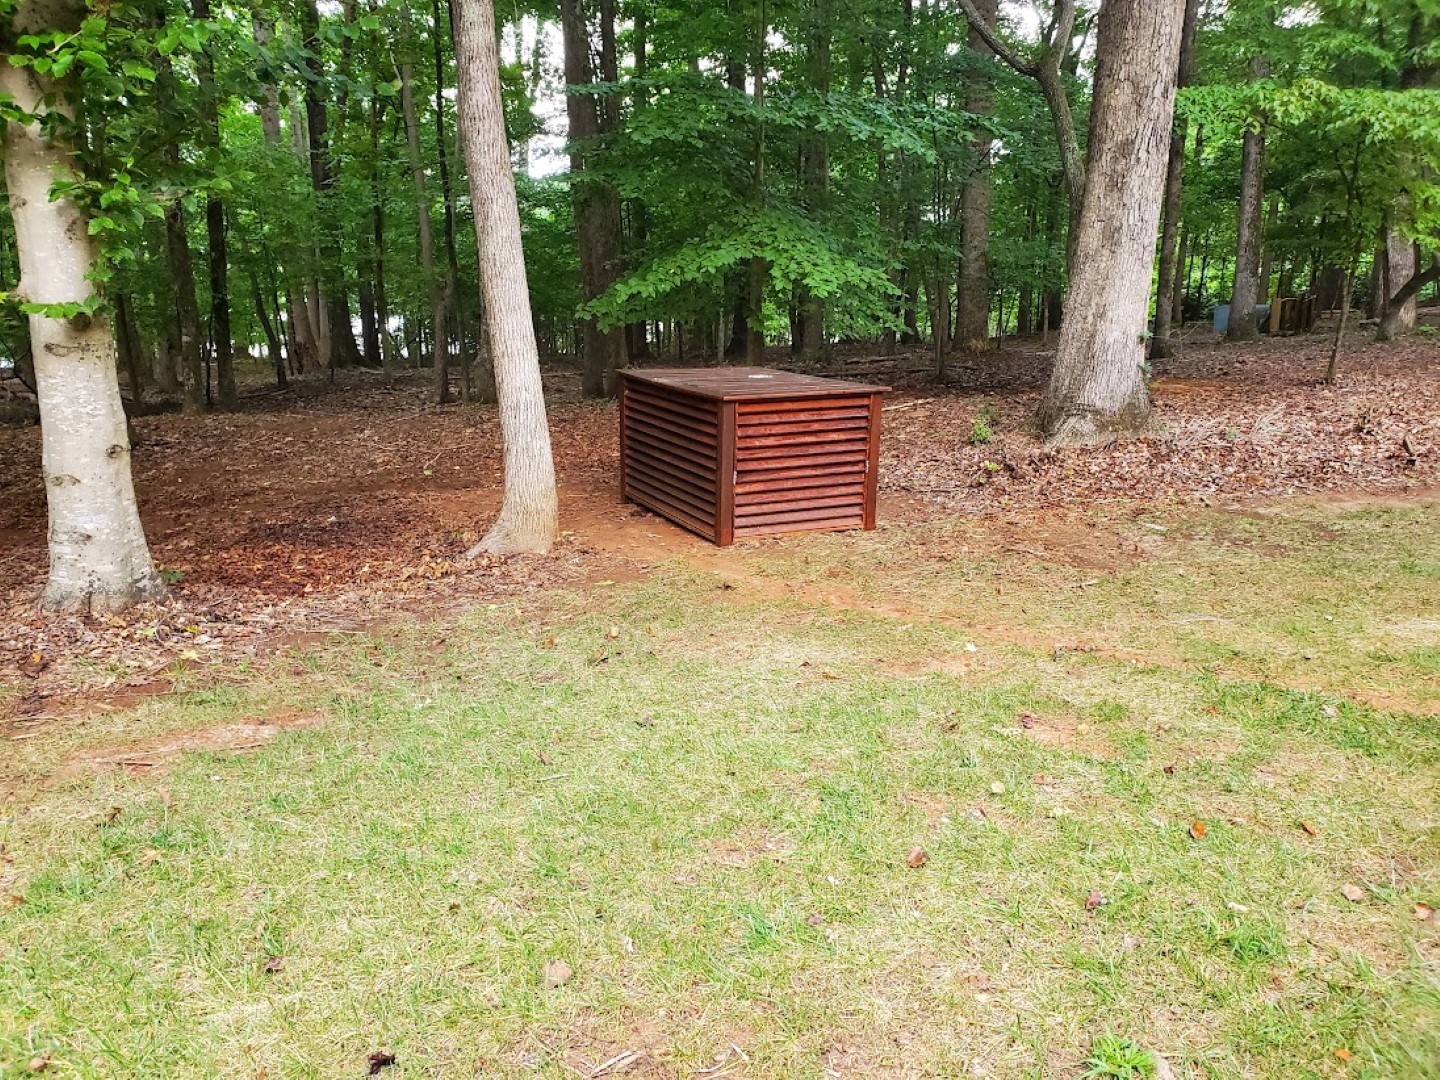
Louvered Generator Cover
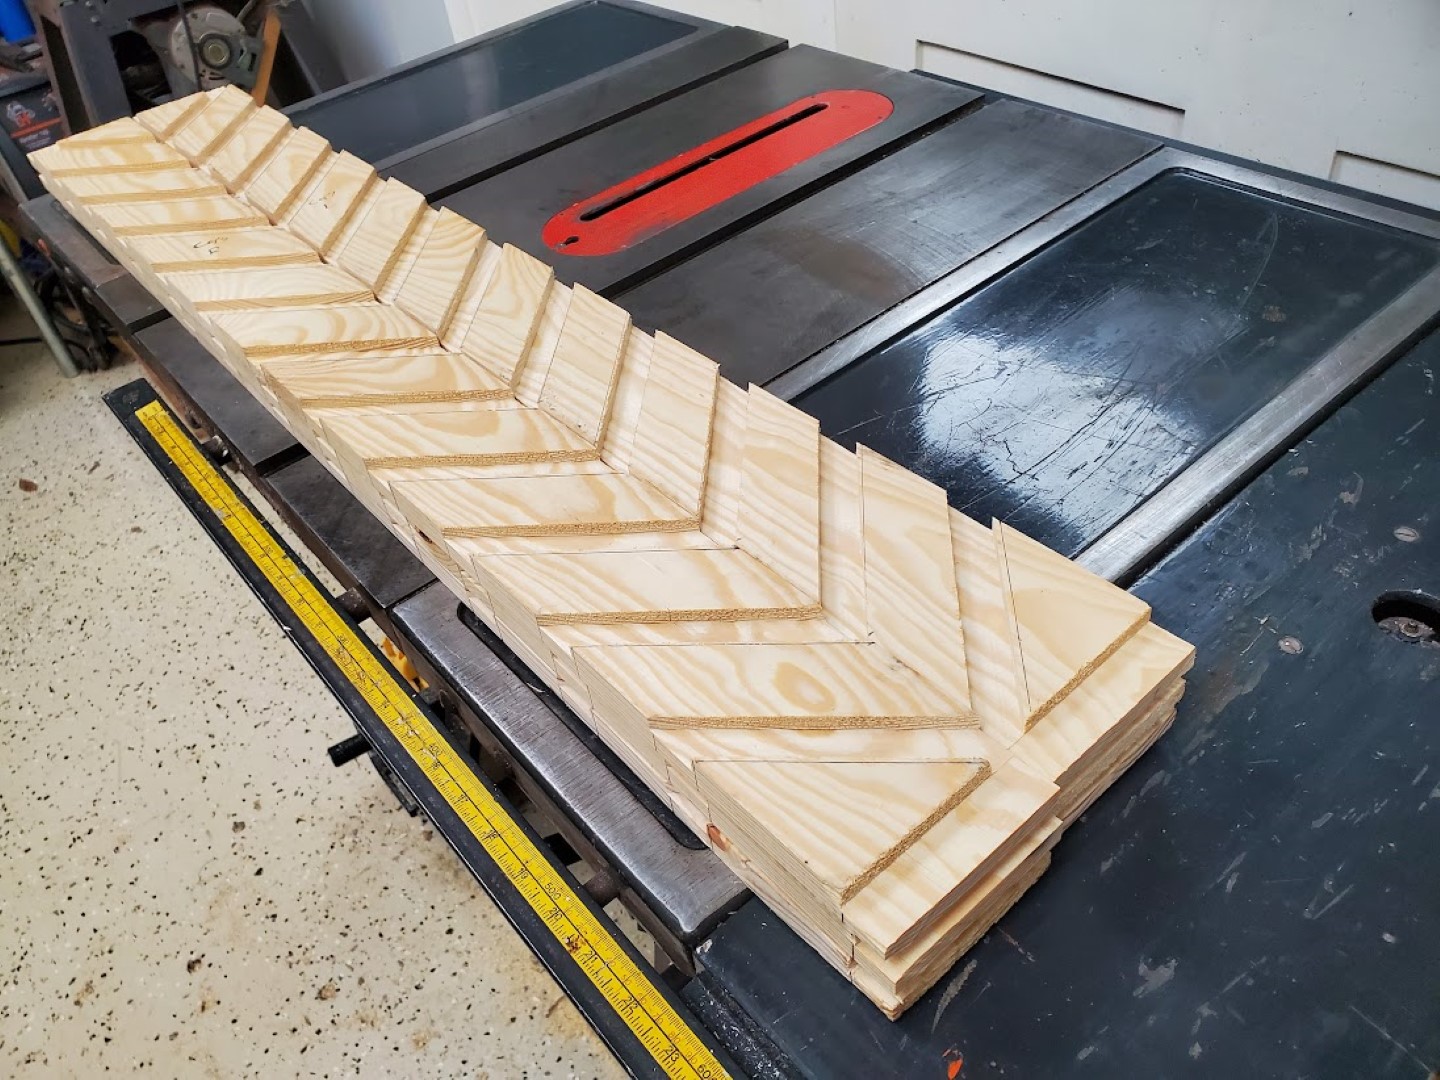
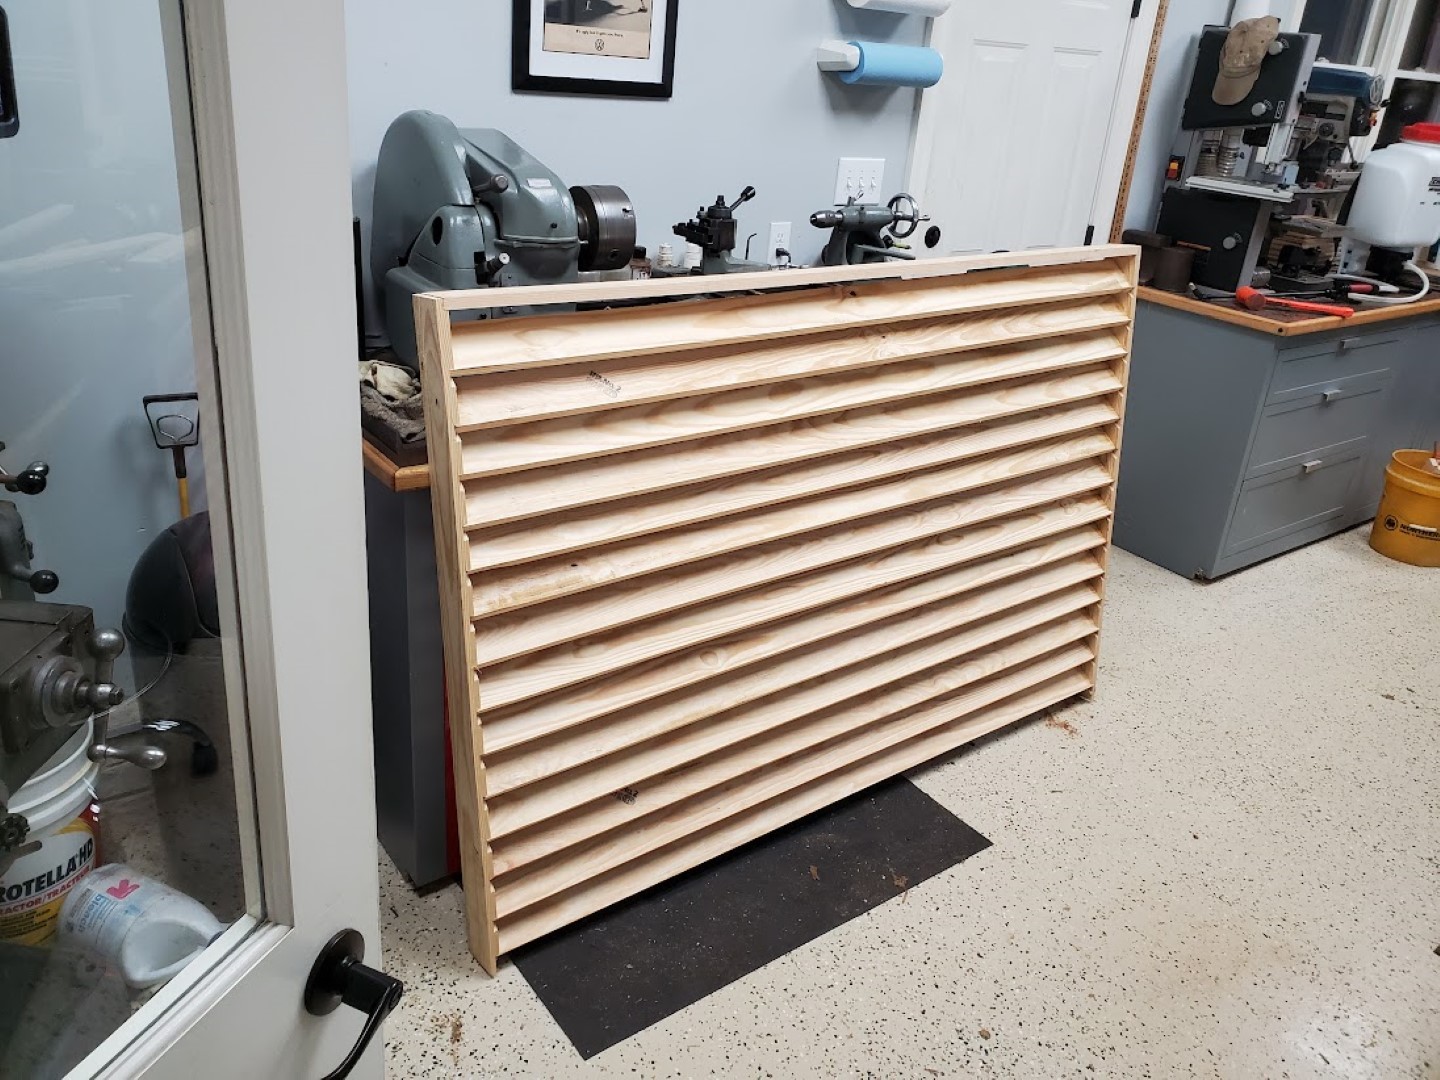
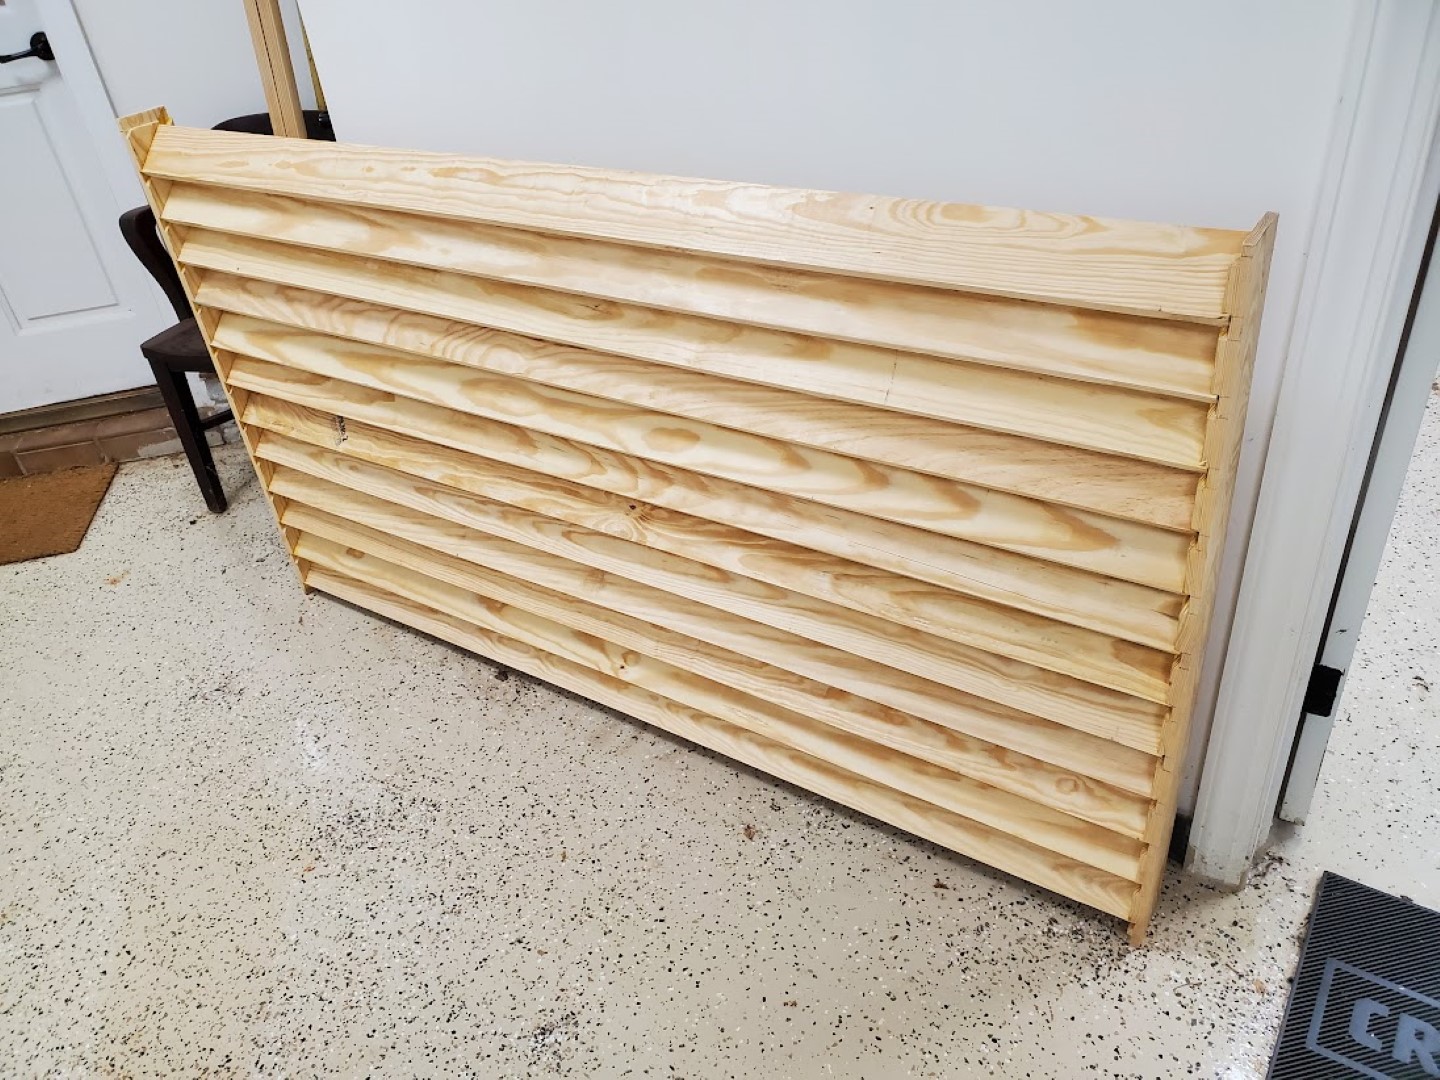
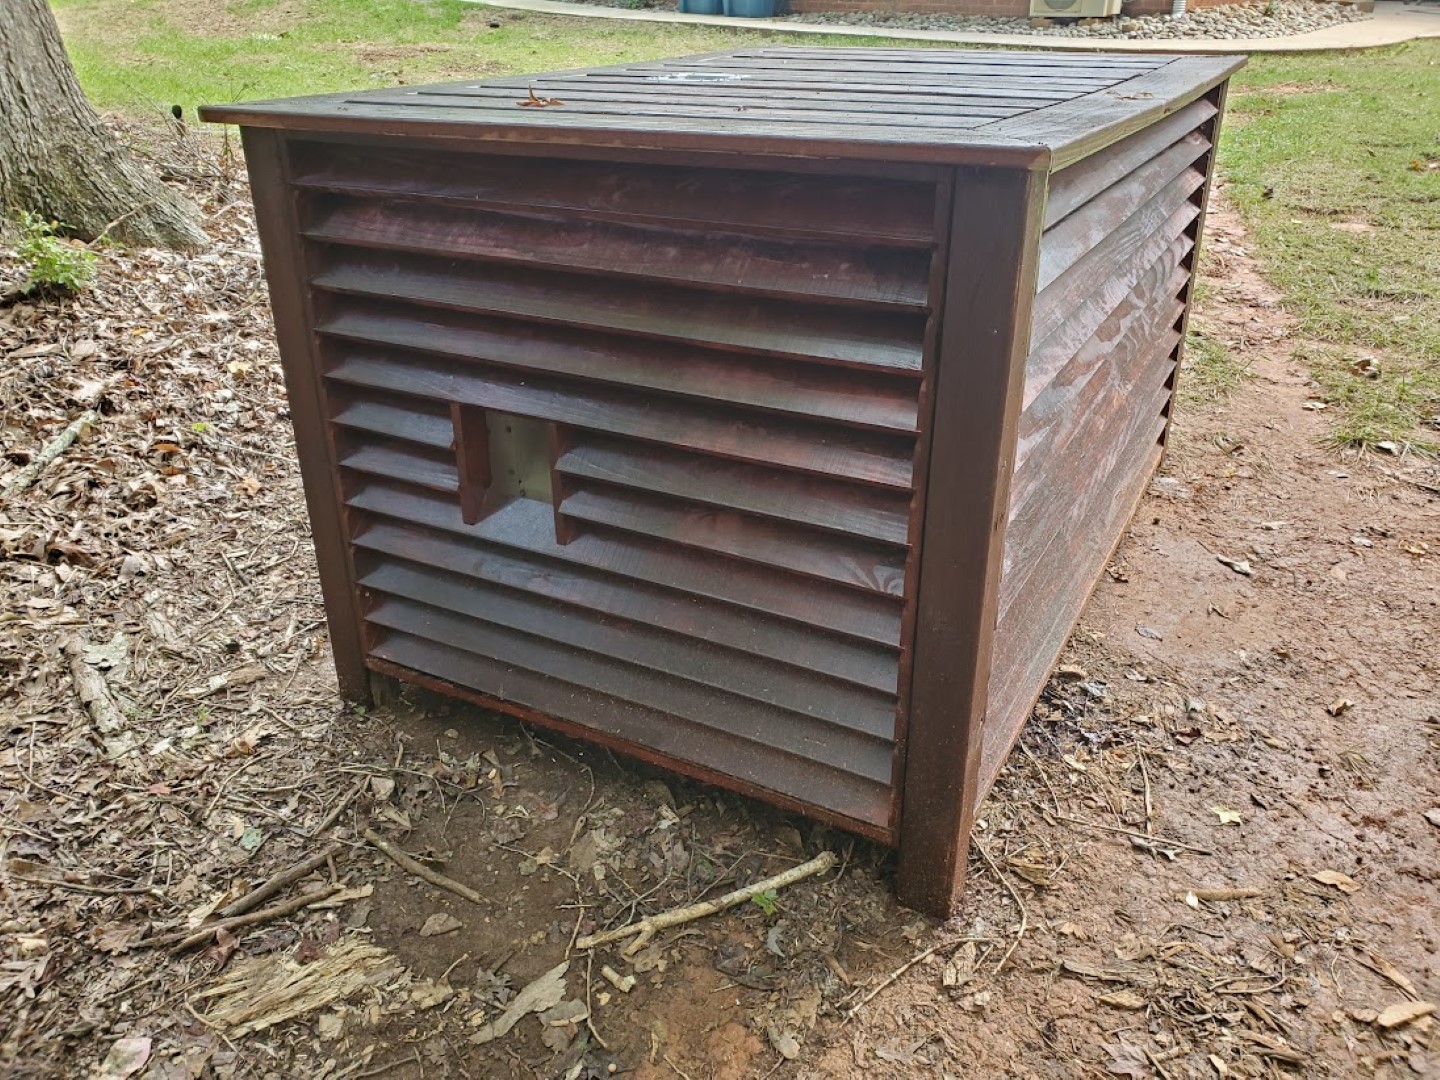
The generator is still working great but as the side of the yard it’s in has become more polished (trees/undergrowth removed, grass planted, sidewalk added, trailer moved) the generator has started to stand out more. To help it blend back in I created some louvered panels to cover it. The louver design allows for plenty of ventilation from all sides. The panels consist of 1×4 slats secured into 1×4 ends with angled grooves cut via dado stack. The panels corners are joined together at 4×4 posts. The rear panel has a cutout for refueling, the top has a cutout for the exhaust flap (with flashing for heat protection) and half of the front folds down for control panel access.
I also made a similar but much smaller cover to go over the top of the plastic service dome for our underground propane tank.
Stump Grinding
I rented a huge stump grinder this weekend to take care of the stumps from the various trees that have been taken down. The stump grinder moves incredibly slowly, so I moved it around the yard on the trailer with the mower.

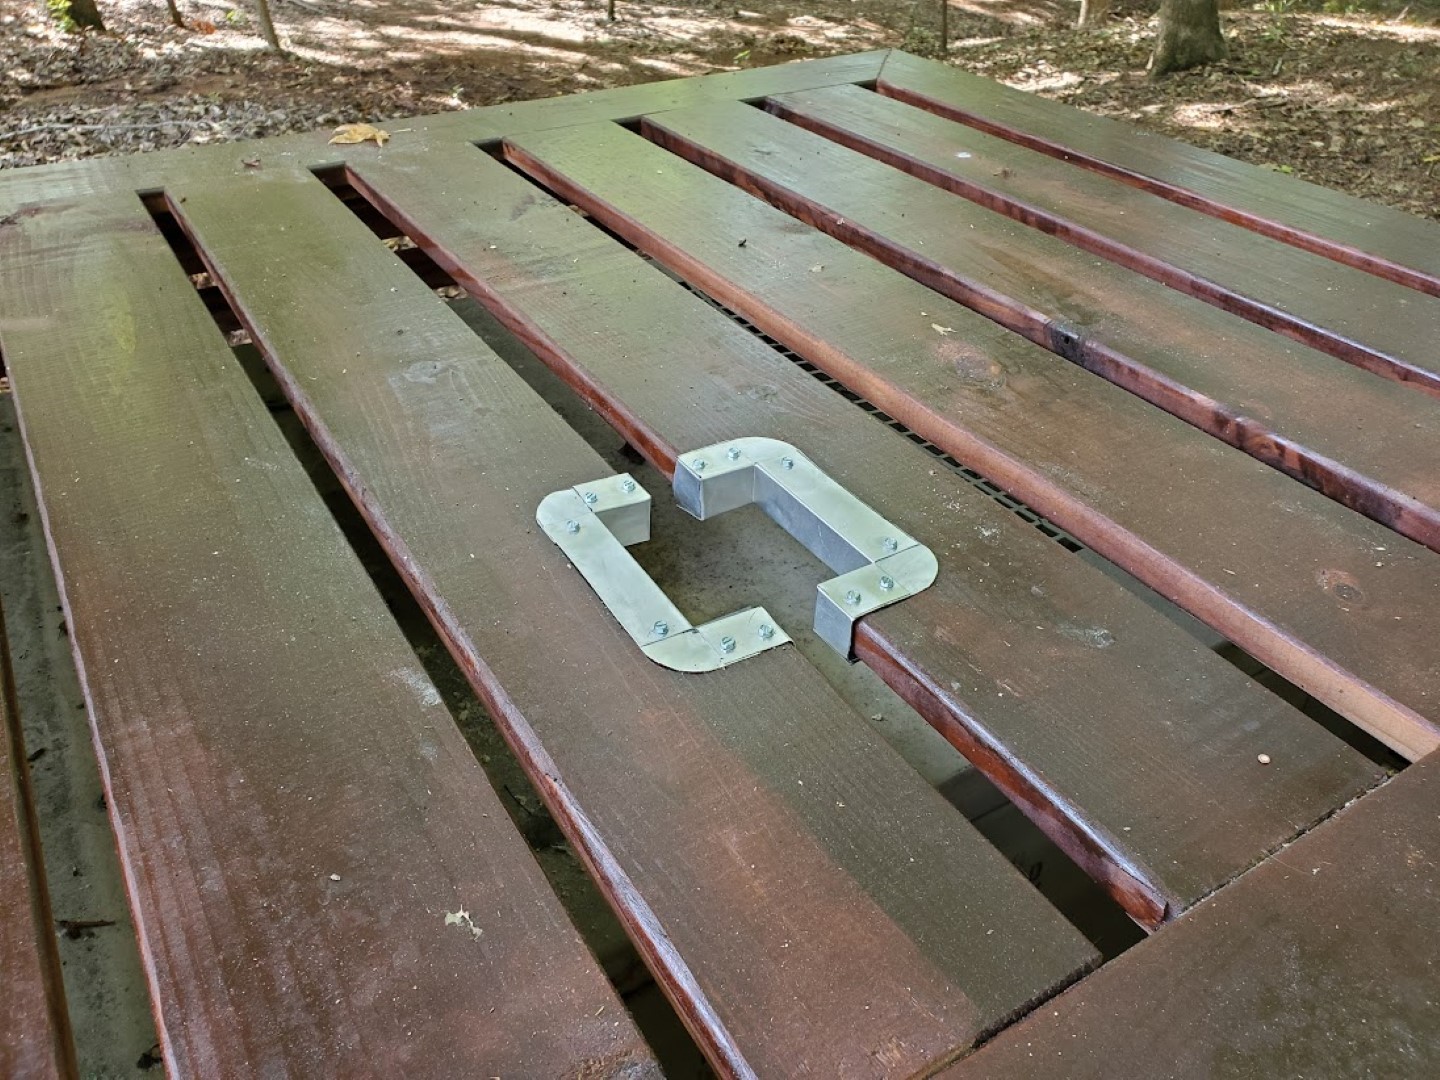
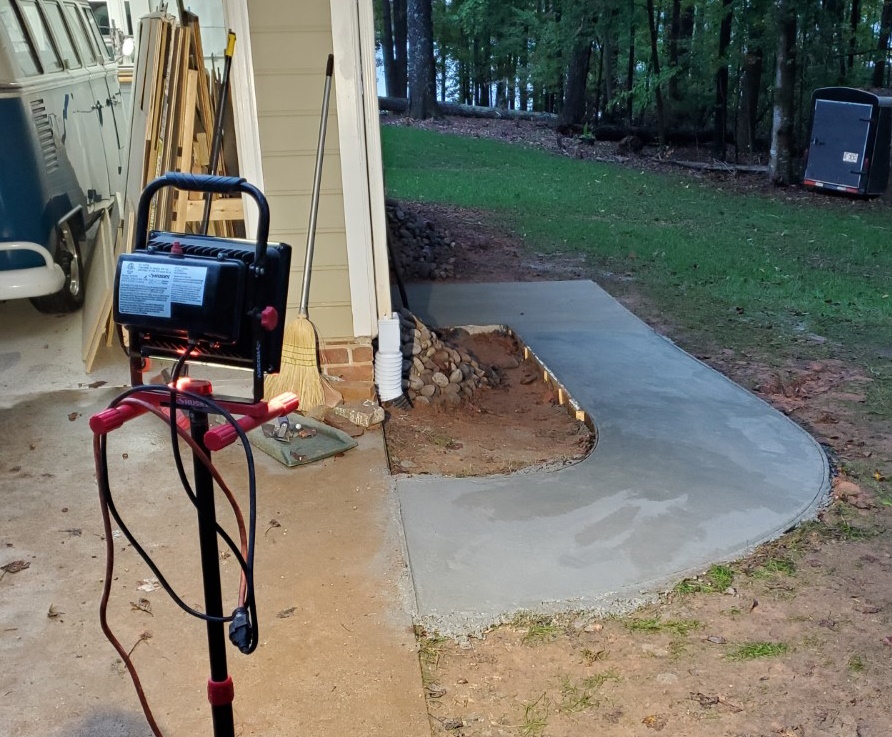
Sidewalk Project: Nearly Complete
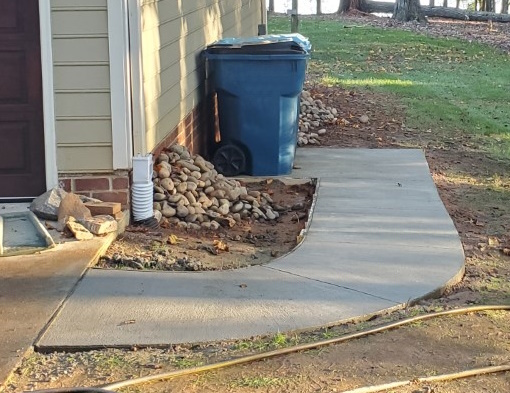
The next two phases of the garage sidewalk project have been completed. The first of these was relatively easy, just a flat section in an alcove between the house and garage. A channel drain was added at the roof drip line and conduit added for future utilities to access the area (hopefully fiber eventually). The second phase was not as simple since there were heat pump units in the way. To get around this I installed a ledger board to the wall framing then made a frame out of old landscape timbers, with the frame legs outside the concrete area. The units were then carefully lifted onto the frames with ratchet straps, making sure not to stress any of the electrical/refrigerant connections. Concrete was then poured the same as before.
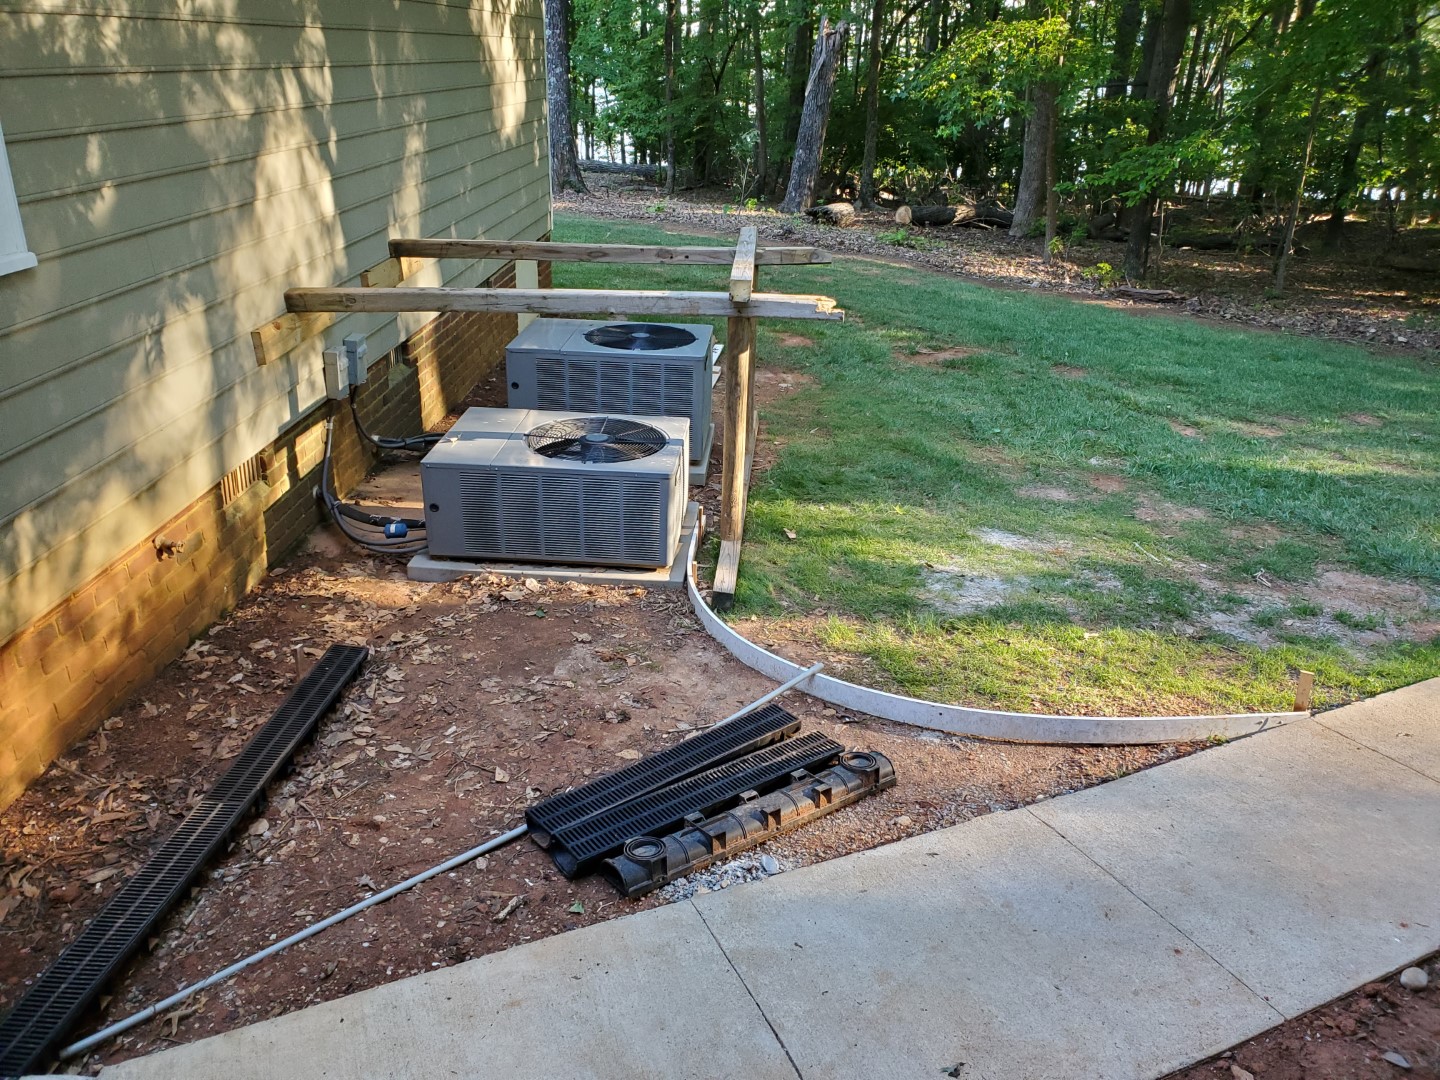
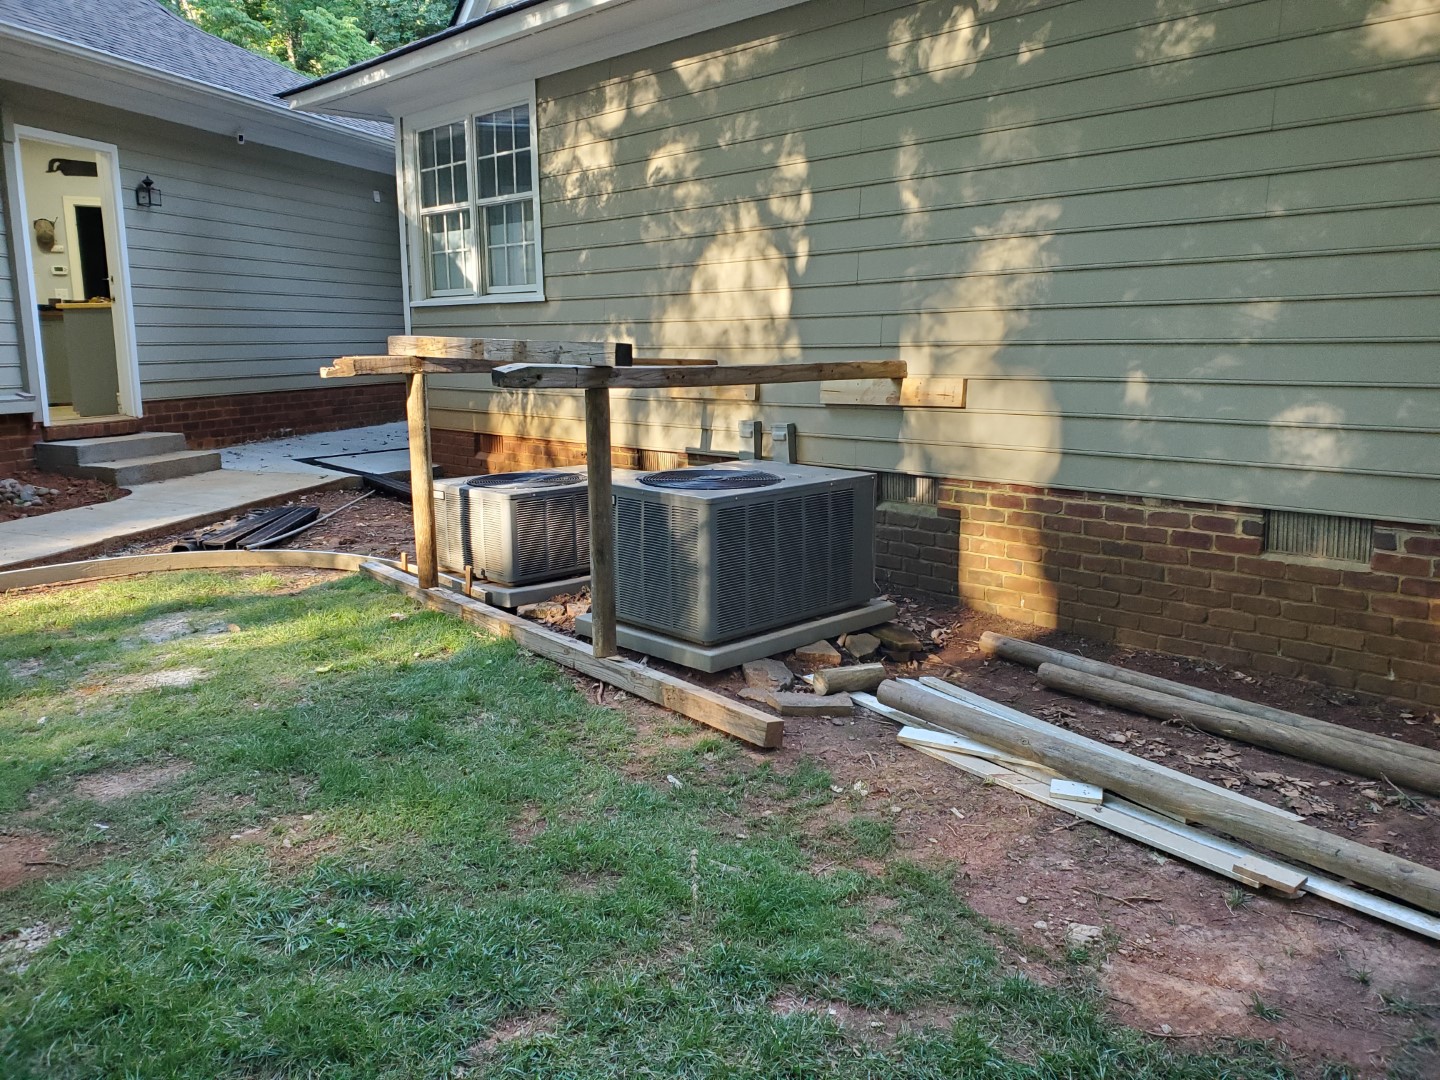
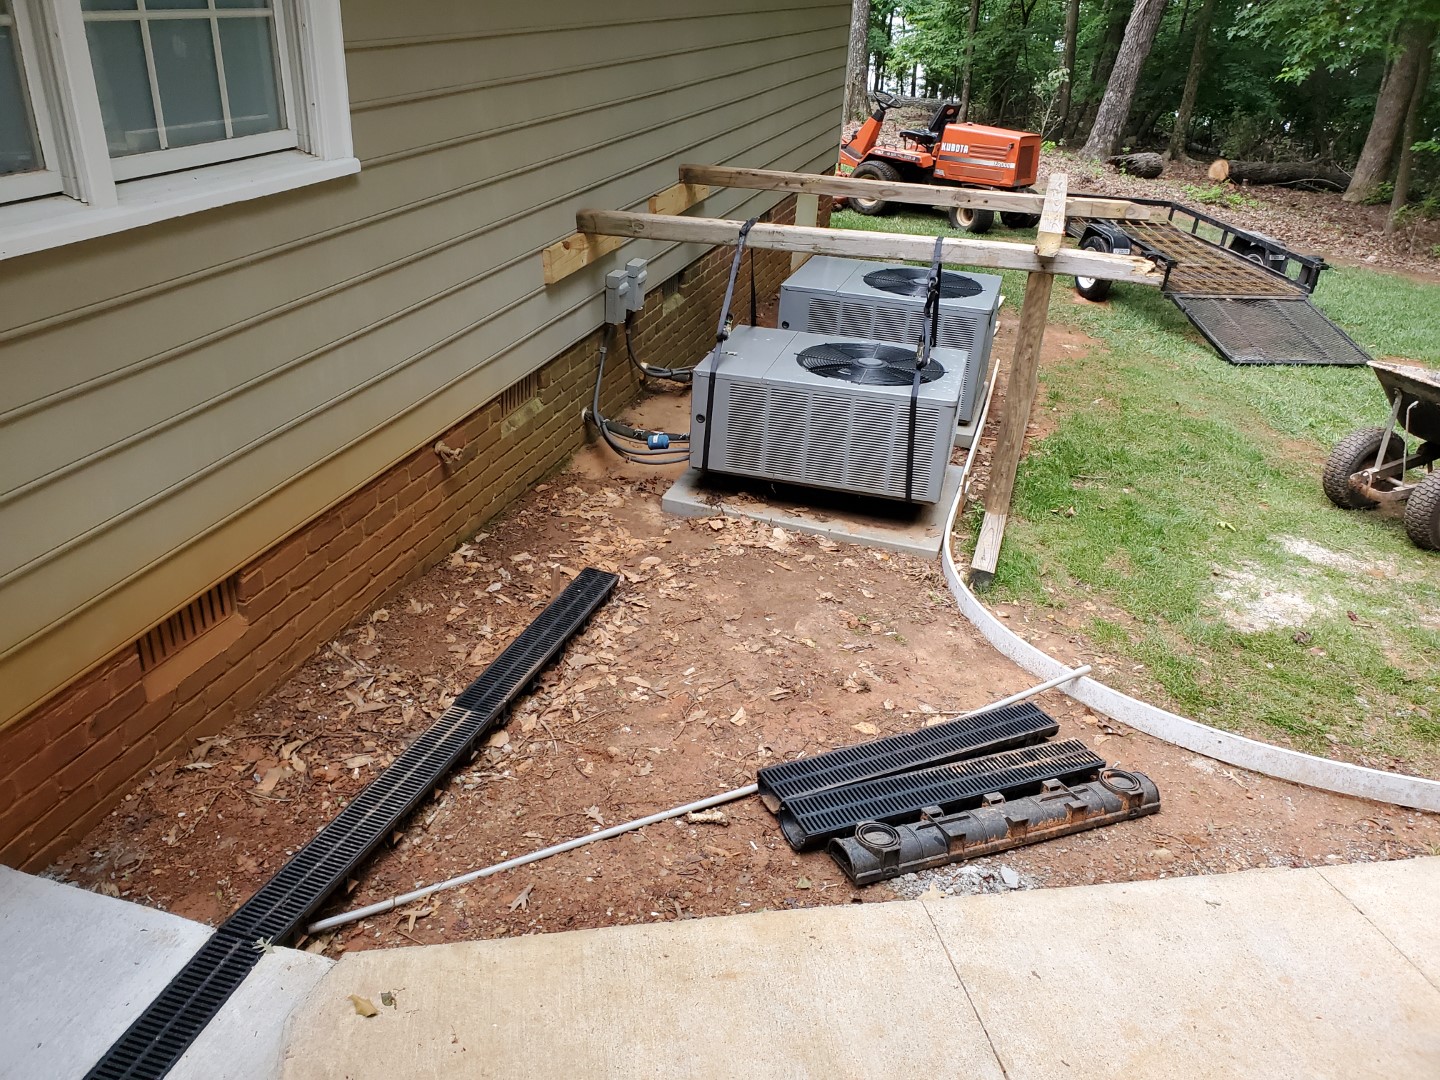
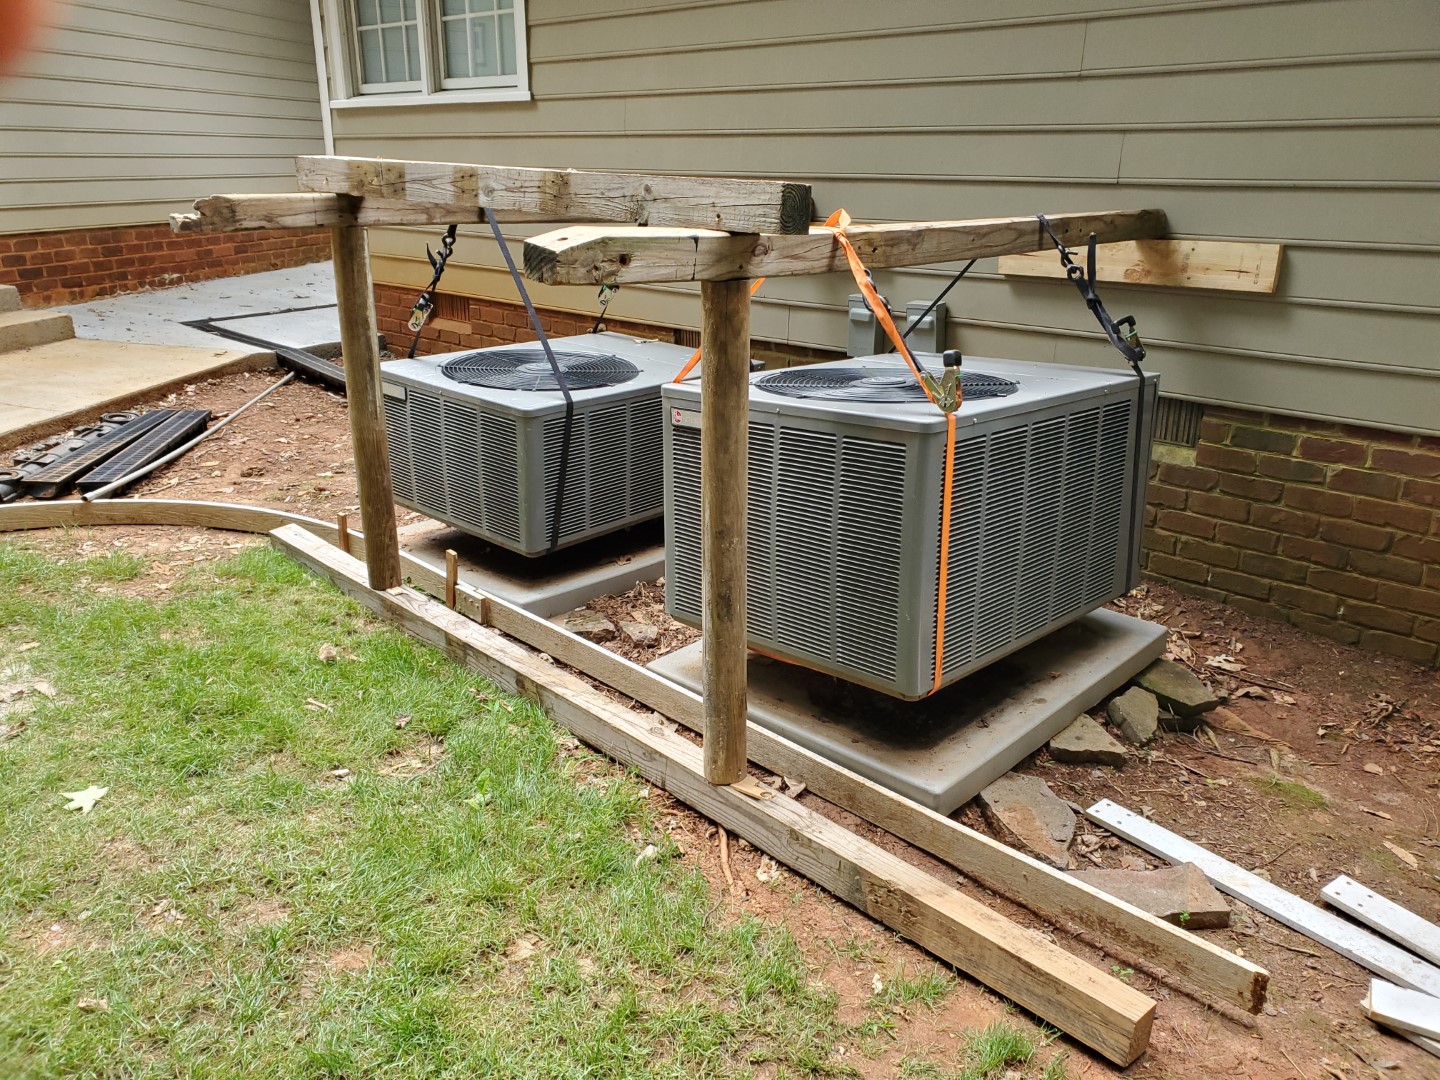
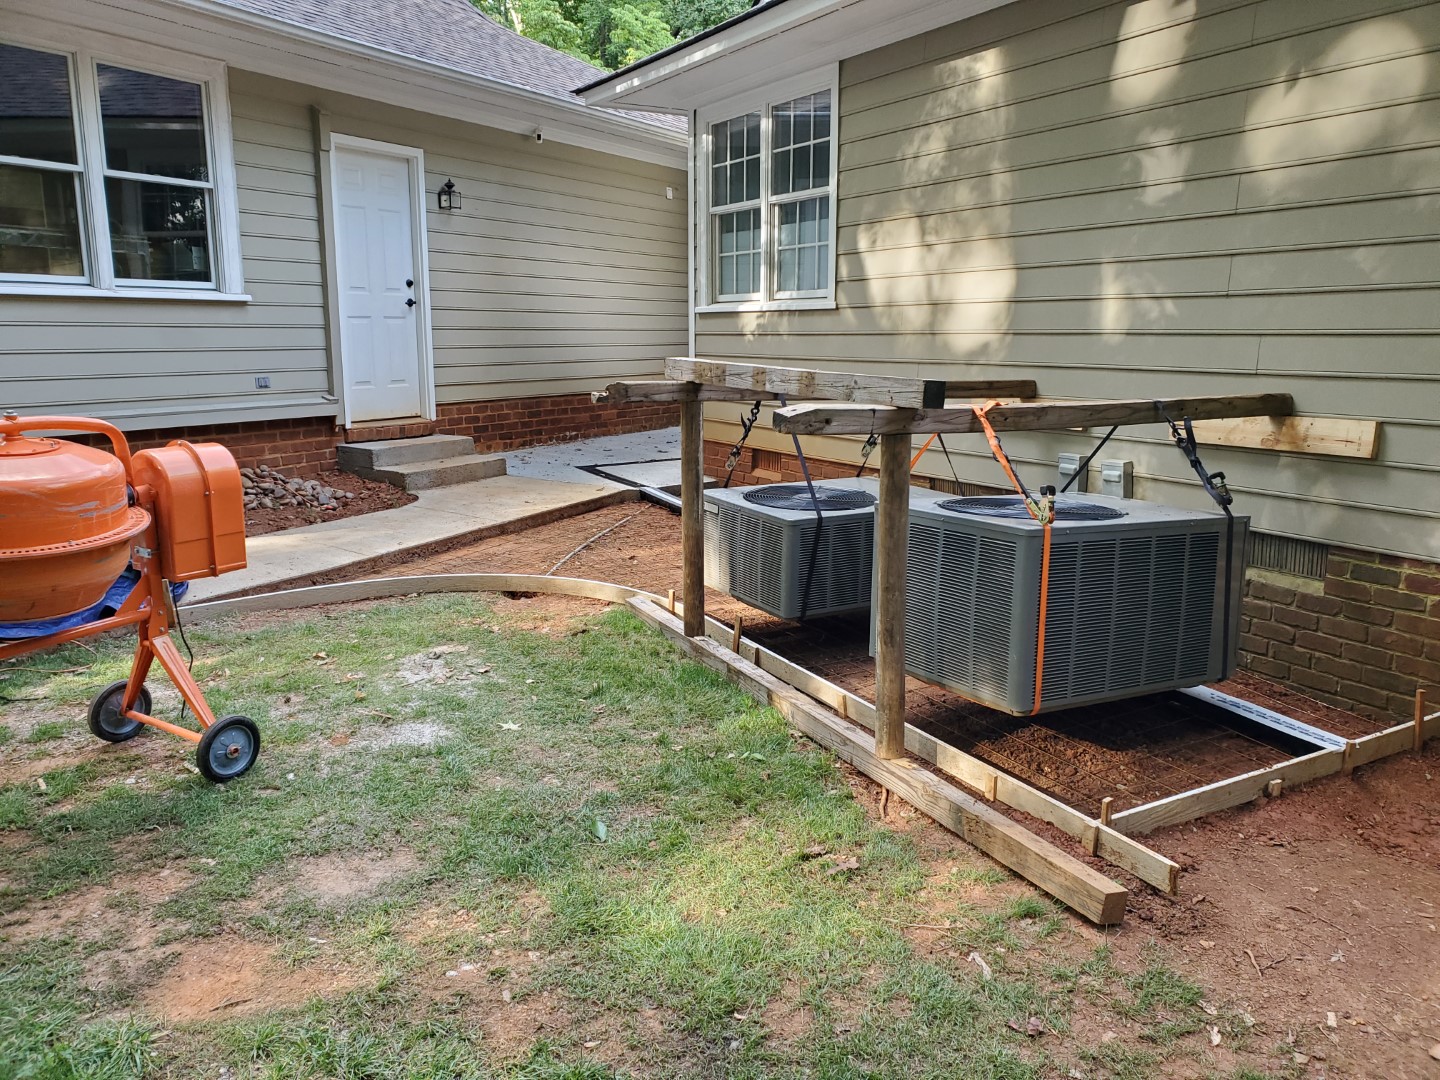

Next phase is one more small section from the heat pumps to the end of the wall, this will catch the rest of the rain run-off and direct all of it into a pipe that will run under the grass.
Sidewalk Sequel
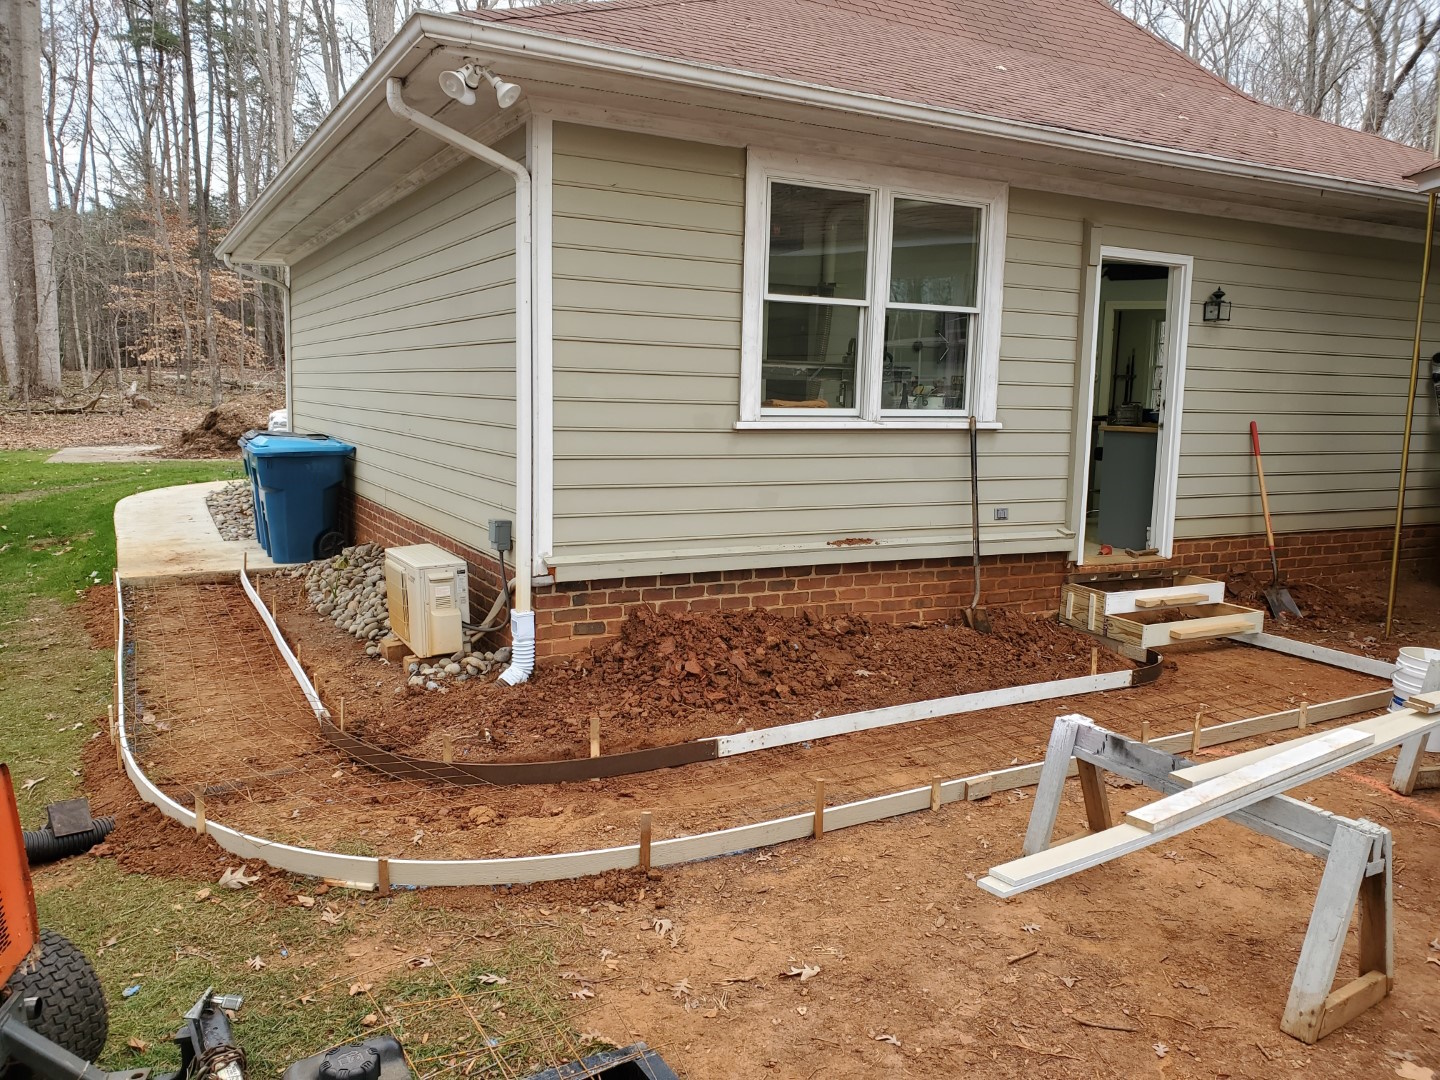
The next phase of the garage sidewalk project has been completed. Same process here, but a larger section was made possible by the addition of a concrete mixer. At the same time the old railroad timber steps to the back door were replaced with concrete. Next phase will be filling in an alcove between the garage & house (along with adding a channel drain to finally catch water from that area) and then last a section under the heat pump units.
Trash Can Sidewalk
Quick project this weekend to create an area for trash/recycling can storage. I used some odd 1×4 composite trim type boards left by the previous owner for most of the forms, for the tighter inside bend I cut a few strips of 1/8″ masonite panel and glued them together in-place. I also setup a length of drainage pipe to direct the gutter downspout under the sidewalk. Wire grid was set in place, then concrete hand-mixed in a wheelbarrow and poured. A few hours later I finished with a broom finish.
Eventually I may add a small fence/wall, but just getting the cans out of the driveway is a big improvement on its own. This yard in this area was holding a pile of landscaping rock until recently, now that it’s been moved the area will be planted with grass.
The sidewalk will eventually be extended around the garage, I’ll likely get a small cement mixer to make the process go faster – mixing a pour this size by hand it becomes difficult to mix and place the concrete fast enough that the beginning isn’t curing differently than the end, which makes finishing tricky.
Saw Milling v2.0
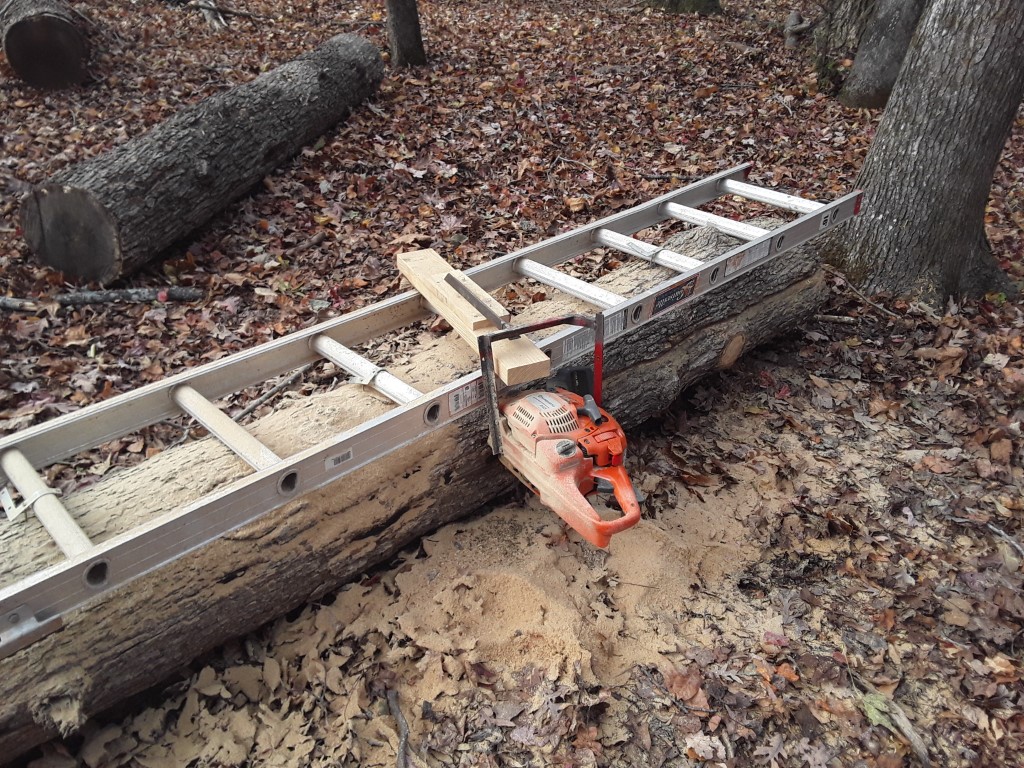
A while back, in anticipation of more log milling, I made a jig for holding the chainsaw level along the length of the cut. This is basically a homemade version of an ‘Alaskan Sawmill’, with a few changes. Since I processed last winter’s log recently it made room for another in the drying area, so I finally had a chance to test out the jig this weekend. For the first cut a ladder is secured to the top of the log to establish a reference surface.
I opted on not tie the reference block into the end of the bar, since I have a limited bar length. Because of this, I also couldn’t make the reference block adjustable without introducing too much flex. Instead, I set it at the maximum board width I may need, and for all thinner boards I’ll add more wood to the block or log to shim it. This also gives me the ability to cut from both sides for a log that’s up to ~2x the bar length.
Altogether this test seemed to work great, the cut was extremely flat compared to the previous log that was cut free-hand. It was fairly slow-going though since I was using a standard chain; I have a ripping chain on order that should cut faster with the grain, I’ll install it before finishing this log.


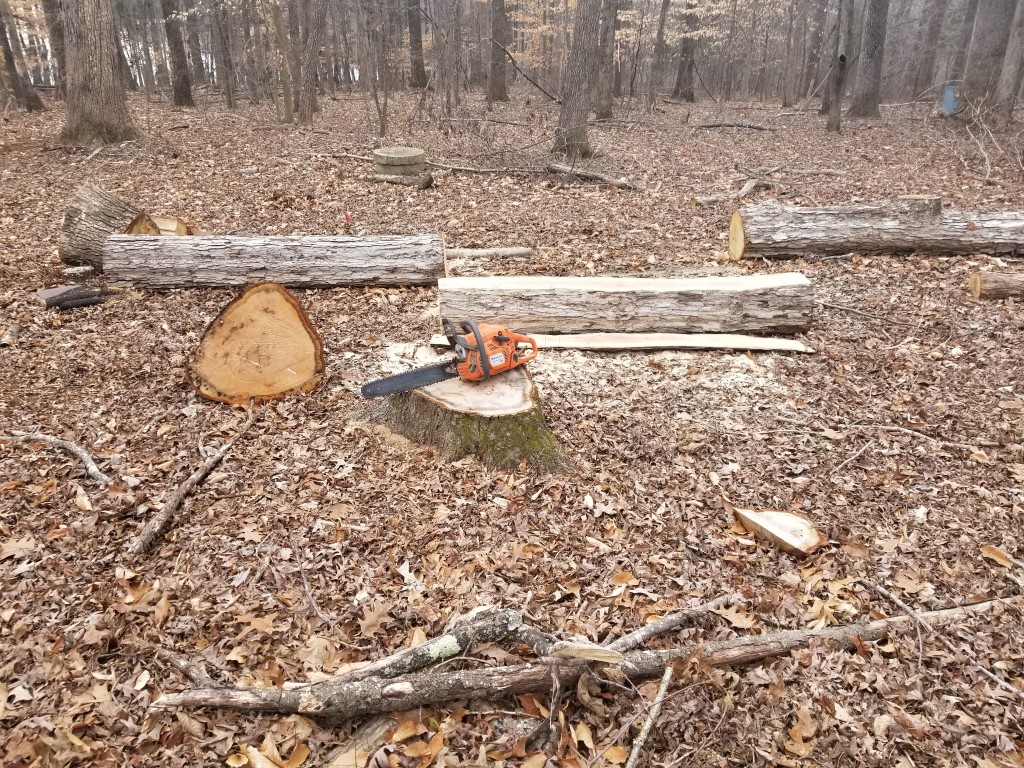
Saw Milling Test
Last fall prior to Hurricane Florence I took down some good-sized white and red oaks. These were great trees but both had large limbs overhanging/threatening the garage, so they had to go. Rather than cut them up for firewood as usual I let them stay where they fell through the winter. Today was unseasonably warm and I took a stab at milling one of the logs. Drying takes a long time, so the point of this was to get at least something started – this way if I don’t finish milling the rest of it for a while I’ll at least have something in the queue.
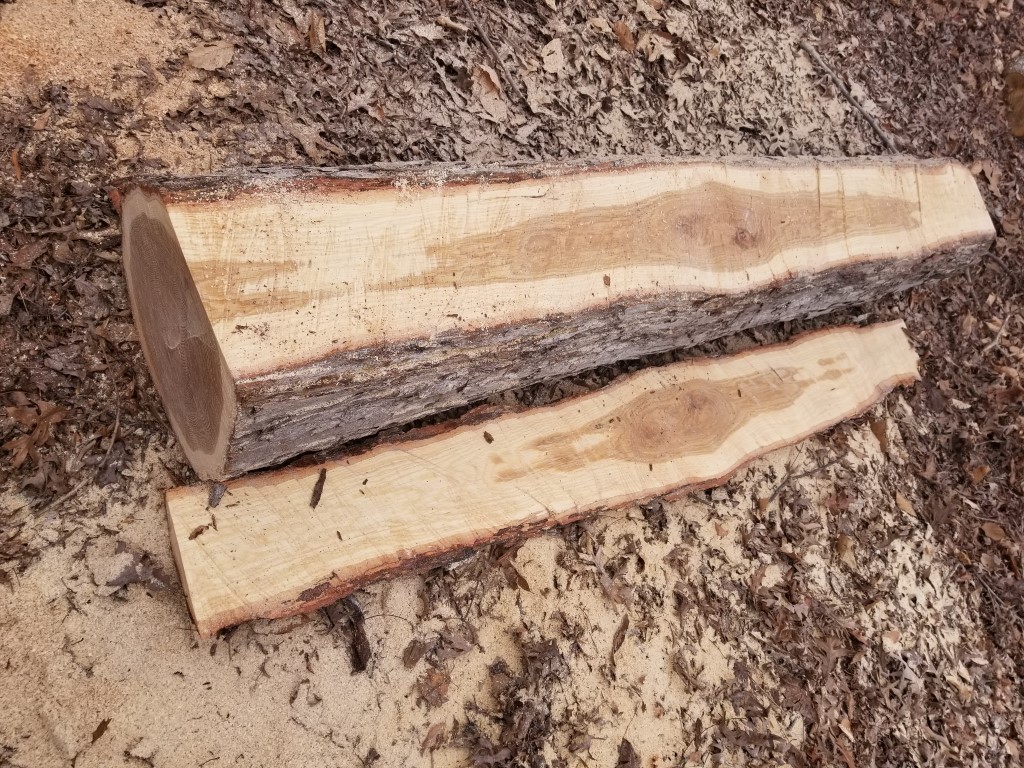
To make the milling cuts I just free-handed with the chainsaw and there’s a good bit of variance in thickness as a result; to get straight boards I’ll have to deal with this variation at the joining/planing stage. For the next attempt I plan to build a metal guide frame over the saw to allow it to rest level on top of either a ladder laid on the log (first cut) or the level surface made by previous cuts. Also, my saw is a middle/low power model (3HP) and bogged down occasionally. Normal chainsaw chain is meant for cross-cutting and takes too big of a bite for ripping, for the next attempt I plan to modify an old chain into a ripping chain by grinding back some of the teeth – these converted teeth will help clear chips out of the cut rather then cutting themselves and it should mean less bogging down.
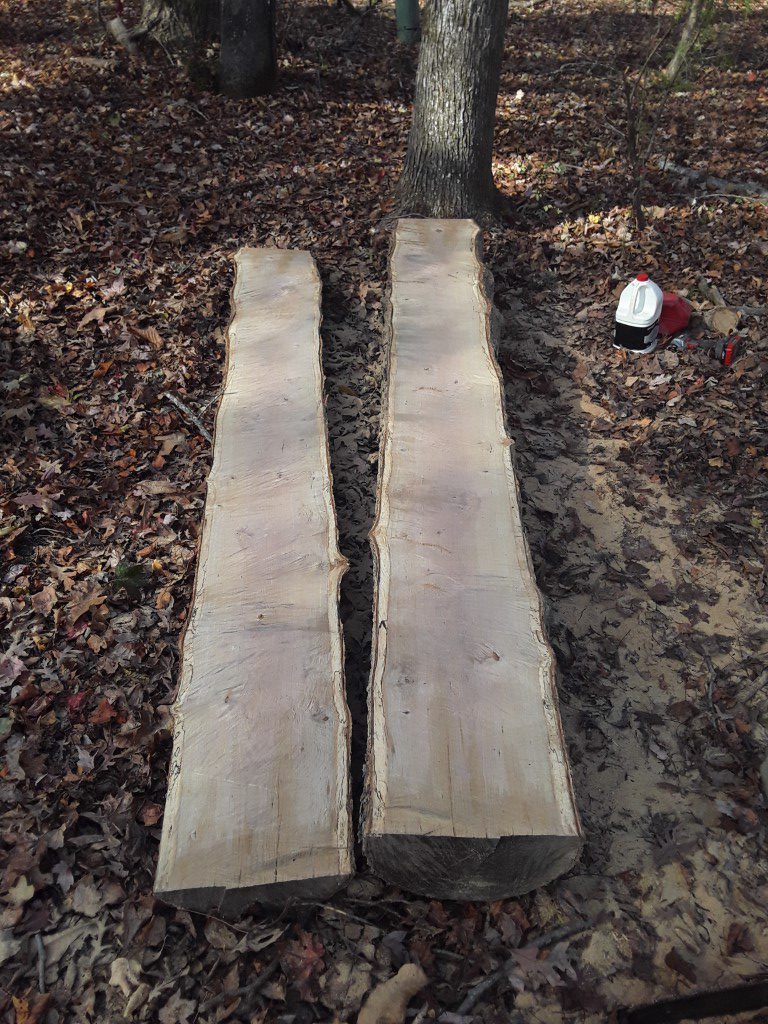
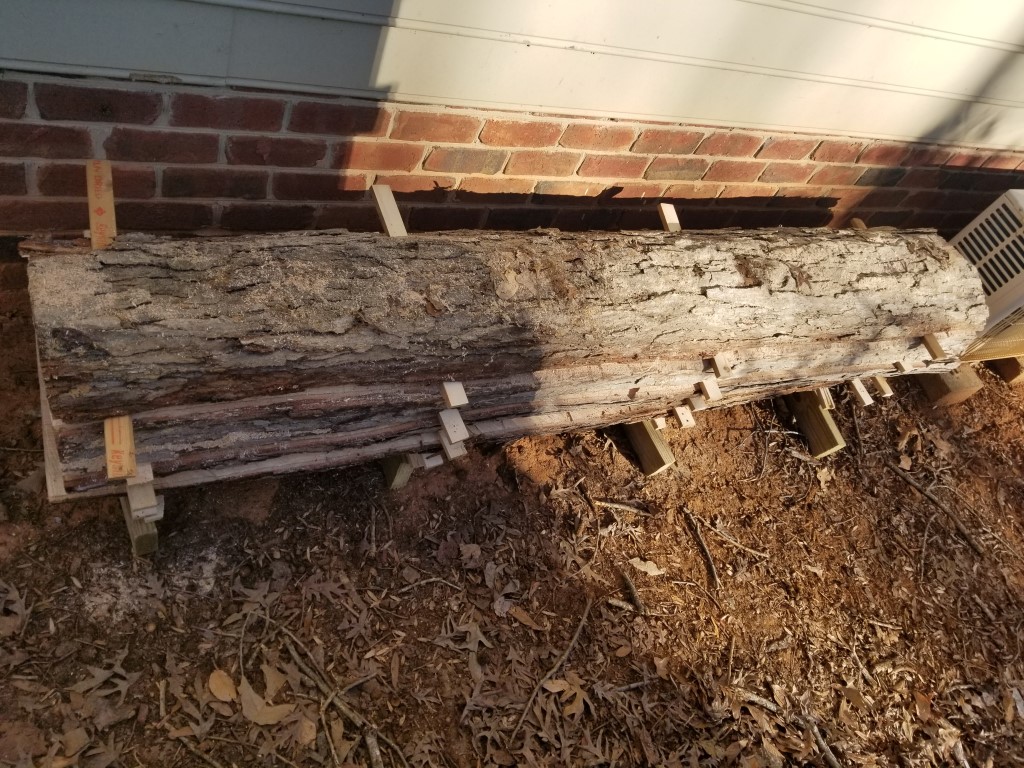
Once milled, the log was reassembled with some ‘sticker’ pieces I cut from scrap 2×4’s to create airflow gaps. It’s under an overhang that should provide enough rain protection. The drying happens from the inside out over a long period of time, getting wet from rain only temporarily increases the moisture level on the outside; this dissipates quickly and doesn’t hurt the overall dry time. Drying should take about a year per inch, the slabs are about an inch and a half on average so I may be able to use these as soon as next summer.
We have some ideas for the wood but no immediate plans; this is just a long-term thinking/prep. The white oak is good outdoors and may become some much-needed patio furniture. The red oak may be used to upgrade the fireplace mantel and be used for a headboard and side tables.


Spring Gardening
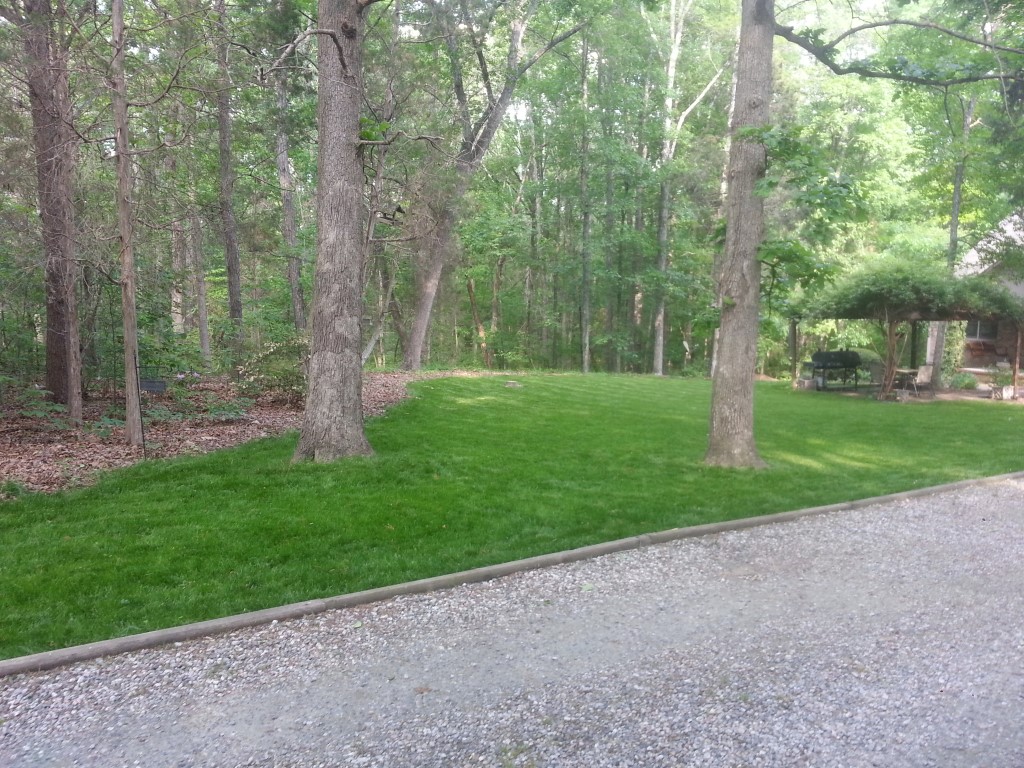
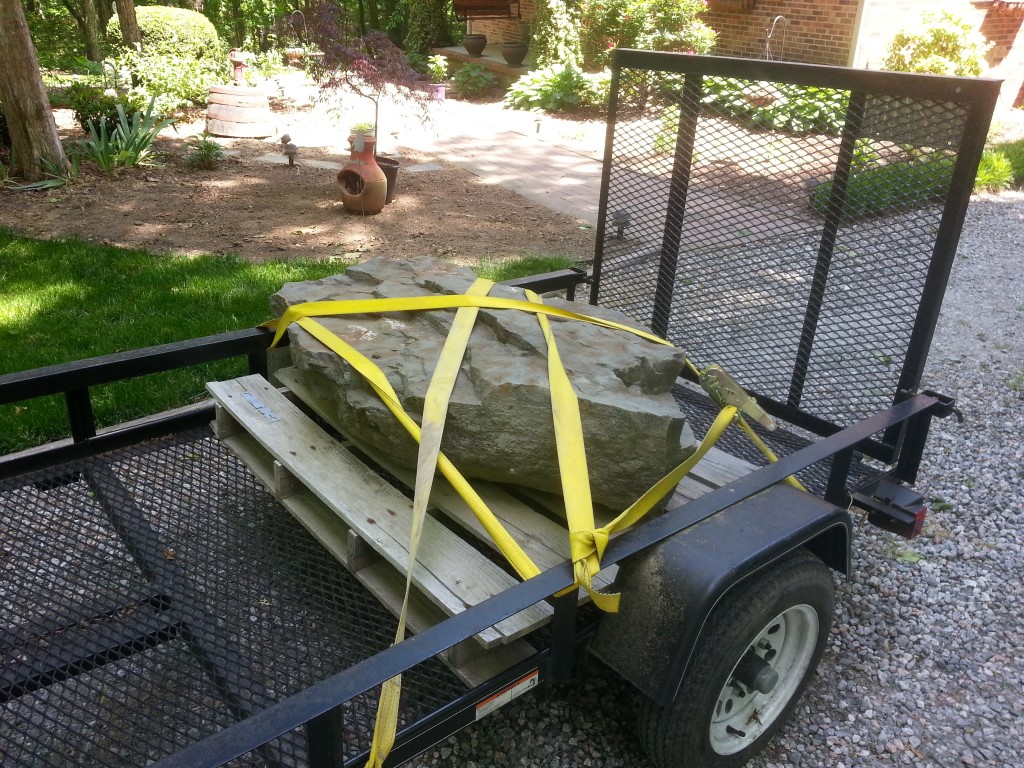
Lots of yard work lately, the tilling and composting last spring definitely seems to have paid off and grass is finally growing even in the shadiest areas. The bus was enlisted into the effort as plant transport, and we also picked up a big landscape boulder. A big spider joined in with guarding the garden hose, see brick for scale.


Prepping the yard for Spring
In years past the yard has struggled to survive, this year we’re getting serious about fixing it. Soil tests confirmed that the entire yard is devoid of anything capable of reliably sustaining plant life; It’s basically 100% clay.
The city runs a facility nearby that takes leaves & limbs (for free) and turns them into compost/mulch (for about $0.01/lb). I’ve dropped of limbs many times in the past, but had only picked up once and couldn’t get much at a time since the pile forms a pyramid on the open trailer. To remedy this, I made some simple sides out of plywood. The sides are very strong but still pack up for easy storage in the shed attic. After tilling up the whole front yard we picked up 3 loads of compost averaging about 2000lbs each. This is the upper limit of what the Golf is rated for in the US, though less than 2/3 of the european rating (1500Kg=3300lbs) for the exact same vehicle; this was evident in that there was plenty of power/braking to spare.


We spread the compost over the entire front yard and then mixed it in with the tiller and raked it level. Next weekend the same routine will be repeated for the side and back yards, followed by planting and fertilizing. Even with 12000lbs of compost added it’s only a marginal improvement to the soil over a relatively large surface area, so part of the plan is using creeping red fescue. Creeping red fescue is one of the most shade tolerant grass species and it also tolerates poor soil well. Hopefully from this point onwards the soil structure will only improve as it will get aerated and top-dressed with fresh compost yearly.
