Rear Lowered
In the video it’s readily apparent that the back is higher than the front. This is because I had flipped the front spindles but not yet adjusted the rear suspension. Tonight and last night I fixed this by re-indexing the torsion bar spring plates one notch lower. I didn’t get any pictures but it is much better looking now; it’s within a degree or so of being level. The rear is still very slightly higher than the front; this should be corrected by the weight of the parts that are yet to be installed (windows, interior). Even if this is not the case I prefer this to having the front slightly higher, which looks odd; nearly all modern cars are biased towards having the rear higher when unloaded.
First Drive
Tonight I finished installing the accelerator linkage. With this in place it allowed for the bus to move under its own power for the first time; I drove it up and down the driveway many times without any real issues. This will allow me to move it in and out of the garage to work on the remaining bodywork in the driveway; saving lots of clean-up time.
Running Better
I replaced the spark plugs tonight and it’s running on all 4 cylinders now. A few parts are on the way that will improve the ignition further and allow the timing to be set for easier starting and better running.
It Runs!
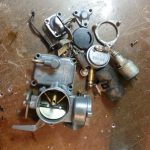
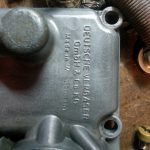
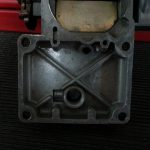
I was able to start it using starter fluid, but it wouldn’t stay running. It was apparent that no fuel was flowing through the carb, not surprising since it hadn’t run in ~30yrs. I was able to find a rebuild kit locally and rebuilt the carb. While rebuilding, I found “9-80 RH” scratched into the inside of the carb body. I’m guessing this means it was last rebuilt by “RH” in September of 1980; which makes sense since it was last registered in 1983. After the rebuild I was able to get it running on 3 cylinders; next week I’ll replace the spark plugs and a few ignition components which should fix this.
Lights
The last few nights have been spent installing the electrical harness and getting all of the electrical parts working. The lights (high/low headlights,blinkers,hazards), wipers, clock, ignition, and starter are all working.
Engine & Battery Installed
Tonight I finished installing the baffles, reassembling, and reinstalling the engine. I also picked up and installed a battery since I’m getting close to hooking up and testing the electrics. Now that the engine is in I was also able to test and adjust the clutch linkage; this is working great, the only driver control that remains is the throttle cable. Remaining to-do prior to starting:
– Install heat exchangers, muffler, and rear apron
– Install alternator/fan/belt
– Connect and test electrical harness
– Connect fuel lines, fill tank, and leak test
– Connect throttle linkage
Engine Out Again
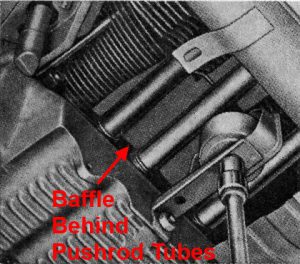
One problem arose with the installed engine: I had left the bottom engine ‘tin’ parts off so they wouldn’t be crushed while moving the engine around on the floor, with the intention of installing them once the engine is in place. This is still a good plan, but what I didn’t realize was that two of the baffles cannot be installed with the push rod tubes in place. Removing the push rod tubes requires removing the cylinder head which requires removing the fan shroud which requires removing the engine: so it came back out tonight. I’m taking this opportunity to replace the push rod tube end seals; I didn’t do this earlier and I got new seals as part of a seal kit.
Engine & Fuel Tank Installed
Today I installed the fuel tank and engine. The engine bay has not been repainted, but the goal at this point is to get it drivable; the engine is easy to remove, so the engine bay can be restored relatively easily at a later date. Also, I have a limited amount of blue paint, it should be enough for everything but just in case it isn’t I’d rather the second batch be used for the engine compartment than running out somewhere on the outside.
Brakes!
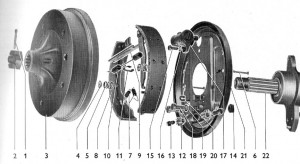
So despite the project reboot, it’s springtime, so house projects are still a distraction from the bus project. I did, however, manage to get the brakes fully operational. The bus has 4-wheel drum brakes, which added greatly to the complexity. Adjusting the brake shoes can only be accomplished through a 1/2″ hole in each of the brake drums; through this hole a geared wheel (perpendicular to the hole) must be turned to move the shoes closer to the inside of the drum. If the shoes are too close to the drum the brakes drag, too far away and the brake pedal travels all the way to the floor.
Compared to disk brakes, drum brakes have the advantage of being ‘self energizing’, as the brake shoes expand against the drum they wedge themselves in somewhat and provide a force multiplication. This makes the extra complexity worthwhile on a vehicle, like the bus, that lacks power brakes. Nearly every modern car has power brakes and 4-wheel discs now; but heavy trucks and ‘real’ buses still use drums.
Another Project Re-boot
There was yet another months-long project hiatus due to miscellaneous other projects (the house/yard, the ‘modern’ VWs, etc.) and business trips. I’m now re-launching the project. Recent progress:
– Shifter linkage installed and working
– All brake components installed
– Parking brake connected and working
– Clutch linkage connected and working
– Initial brake bleeding complete, but still needs some improvement
The plan now is to just get it running so I can easily bring it in and out of the garage to finish the blue paint on the exterior. This will mean that the engine compartment will have to be completed some other time; but that’s OK, I’m sure to have it out again at some point and it’s easy enough to remove anyways.
– Finish bleeding brakes and adjusting brake shoes
– Install driver side steering tie rod and perform crude alignment
– Install steering wheel
– Install driver’s seat
– Install fuel tank
– Install engine
– Install battery and hookup electrical components


